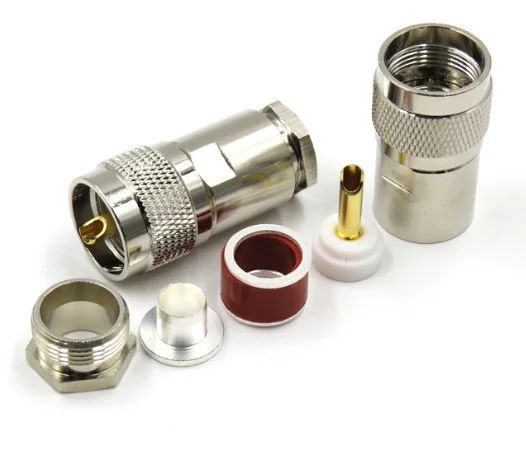
2 шт. Новый PL259 UHF Штекерный зажим Rf соединитель для LMR400 RG8 RG213 RG214 коаксиальный
273.6


Сохраните в закладки:


*История изменения цены! Указанная стоимость возможно, уже изменилось. Проверить текущую цену - >
| Месяц | Минимальная цена | Макс. стоимость | Цена |
|---|---|---|---|
| Sep-16-2025 | 6055.2 руб. | 6358.20 руб. | 6206.5 руб. |
| Aug-16-2025 | 6004.86 руб. | 6304.35 руб. | 6154 руб. |
| Jul-16-2025 | 5037.96 руб. | 5289.75 руб. | 5163 руб. |
| Jun-16-2025 | 5902.64 руб. | 6197.46 руб. | 6049.5 руб. |
| May-16-2025 | 5139.57 руб. | 5396.36 руб. | 5267.5 руб. |
| Apr-16-2025 | 5800.43 руб. | 6090.79 руб. | 5945 руб. |
| Mar-16-2025 | 5749.54 руб. | 6036.5 руб. | 5892.5 руб. |
| Feb-16-2025 | 5699.51 руб. | 5984.87 руб. | 5841.5 руб. |
| Jan-16-2025 | 5648.58 руб. | 5930.88 руб. | 5789 руб. |
Новые товары
Характеристики
Описание товара
Now the following things are not inculded.

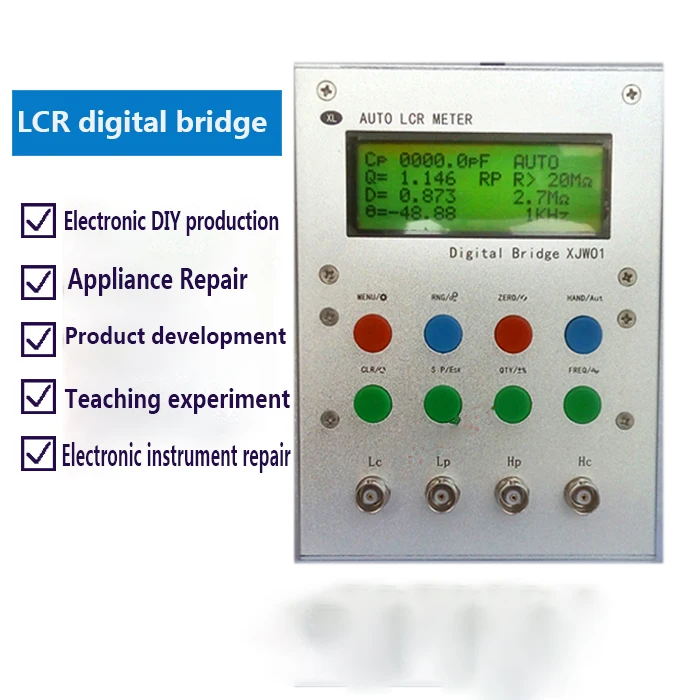
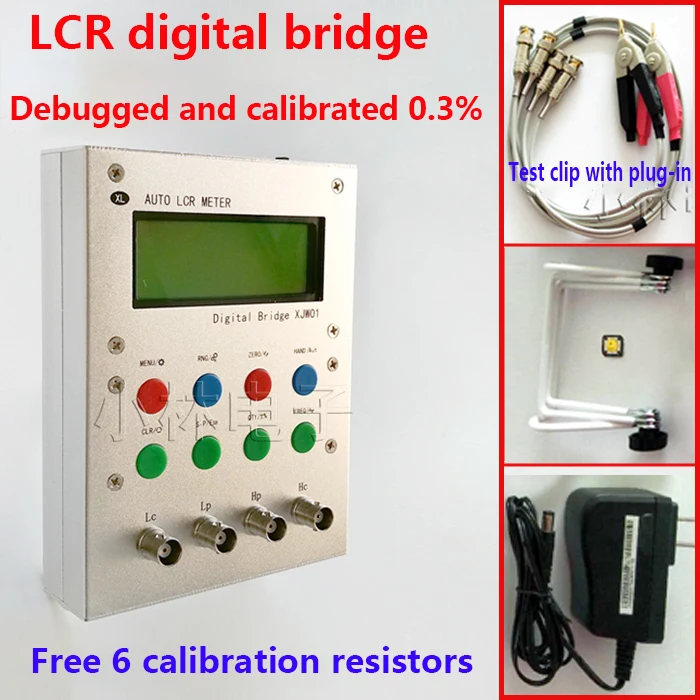
XJW01 DIY digital electric bridge instruction
Hardware version V3.0 Software version V5.5
Range L 0.05uh--2000h R 0.1 milliohm-20 megabytes C 1p-200,000 microfarads
This bridge uses 12V1A power adapter,
The standard Huawei optical modem adapter (disassembled) produced by Huntkey, please do not change the power supply of other manufacturers at will!
Note: If you use batteries: (connect three 1860 batteries in series with a 0.3V voltage drop diode and a 10 ohm current-limiting resistor plus a 0.5 ampere fuse. Prevent the power supply chip from being burned out when the leakage current is too large at the moment of the switch)
HC HP is a group, connected to the red clip. LC LP is a group, connected to the black clip, it is AC test regardless of positive or negative
Do not measure the charged components before testing the capacitor. Be sure to discharge the capacitor
Please don't connect the case to the earth, and don't touch other charged objects! ! !
Turn on the power and turn on the switch.
The first screen displays the author information of the LCR digital bridge

Then enter the working state: 2004 screen shows:


DIY LCR digital bridge
Features:
⑴ Main display 1999.9 count, secondary display 999.9 count
⑵ Measuring frequency: 100HZ/1KHZ/7.8KHZ
⑶ Measuring voltage: 0.2Vrms
⑷ Output impedance: 40Ω
⑸ Basic accuracy: 0.3%
⑹ LCR automatic recognition/manual measurement
⑺ Open circuit/short circuit calibration compensation
Main parameter display: Secondary parameter display: Secondary parameter display range:
Cp: Capacitor parallel mode Q: Quality factor Q: 0.000-999.0
Cs: Capacitor series mode D: Loss factor D: 0.000-9.999
Lp: Inductor parallel mode θ: Phase angle θ: -179.0-+179.0
Ls: Inductor series mode Rp: Equivalent parallel resistance
Rp: Resistance parallel mode ESR: Equivalent series resistance
Rs: resistance series mode Xp: equivalent parallel reactance
Xs: equivalent series reactance

Connect the test clip and clear it first. Open/short circuit clear.
In automatic measurement mode,
Press the "ZERO (C)" button to perform 1khz 7.8khz 100hz sweep frequency open circuit clearing

The test clips are clipped together to short-circuit and press the ZERO (C) key to clear the short-circuit

In the future, the short-circuit is obviously not zero at startup, and it can be cleared in short-circuit and open-circuit.
Also, it needs to be cleared when changing different test fixtures.
2. If you press the HAND (L) key to switch to manual mode,
The three frequencies need to be manually cleared by ZERO (c) for each open circuit and short circuit.
3. After clearing, first measure 6 resistors, if accurate, the bridge is normal.
(40 Euro 1K 3K 9K 10K 100K)
4. Measuring the internal resistance of the battery: use a resistance profile to measure, use a 1uF-5uF with a withstand voltage of 400-630V
The left and right cbb capacitors are tested in series. This type of capacitor has low esr and high withstand voltage for safety.
First measure the esr1 of the cbb capacitor, and then measure the overall esr2 in series, the equivalent internal resistance of the battery is esr2-esr1
Note: The measured numbers will be bounce, generally only qualitative, not quantitative. Unless string high-quality high-pressure CBB
Operation:
1. Automatic measurement
When the instrument is turned on, the default state is (AUTO) automatic component recognition mode,
The range is automatically switched, and the default measurement frequency is 1KHz.

In the automatic mode, the instrument automatically recognizes the impedance characteristics of the measured object,
The main parameters of L, C or R are automatically selected and the series and parallel modes are extremely suitable.
In the automatic measurement mode, the series-parallel method depends on the impedance of the measured object.
When the impedance is high (>10KΩ), select the parallel mode, when the impedance is low (<10KΩ), select the series mode.
2. L/C/R mode measurement parameters
Main parameter selection, default AUTO in power-on state, press "Mode C-L-R" (X) key
The parameters are selected in turn as "AUTO → AUTO-C → AUTO-L → AUTO-R → AUTO"

The series mode is "ESR" and the parallel mode is "RP". Xs/Xp is only activated when the main parameter R (resistance).
3. To select the serial and parallel measurement mode, press the "s.p/esr (R)" key in the corresponding main parameter mode,
The parameters are selected in turn as "AUTO-<C\L\R> → P → S →AUTO-<C\L\R>".

4. Measuring frequency, this bridge provides 3 frequency test points: 100HZ/1KHZ/7.8KHZ
The default frequency of power-on is 1KHz, press the "FREQ" (F) key
You can select different frequency points to measure "1KHZ →7.8KHZ →100HZ →1KHZ".
5. Open/short-circuit calibration compensation, press the "ZERO (C)" key when the measuring clamp is open or short-circuited
Sweep open circuit/short circuit calibration compensation can be performed.
(When the measuring clamp is open, press the "return to zero (C)" key to clear the sweep frequency open circuit to zero. The test clamp is short-circuited and press the C key to perform short-circuit clearing)
6. In manual mode, press the "HAND(L)" key in any measurement mode
You can enter this mode (manual mode), exit the manual mode and press the "HAND (L)" key.
In this state, the "Range (RNG)" key is available, and the switching range is "40R → 1K → 10K → 100K → 40R".
The following content is displayed:
Parallel series identification, impedance-reactance
Capacitance (inductance) measured value,
Q value
Manual mode identification, measurement frequency, main range,

7. Relative measurement
In the measurement mode, press the "parameter QTY" key (Q), no buzzer sound.
The current measurement value will be recorded and enter the relative measurement mode, press the "parameter (Q) QTY" key again,
Or mode switching, etc., will exit the relative measurement.
In the relative measurement mode, the assistant parameter will display the relative error of the measured object in the recorded value, and the display method is percentage.
The range is: -99.9%~+99.9%
XJW01 DIY Digital Bridge Kobayashi Version Troubleshooting Manual
1. The bridge does not power on, the phenomenon is that the screen does not light up in 2004, the reasons and solutions:
The three chips from left to right are LM358 AO4622 MP1584EN
2. Two lines of black squares are displayed on the screen after booting 2004, the reasons and solutions
1. The 12V adapter is damaged and the voltage becomes low. Replace it.
2. Within 10 seconds after shutting down, please don't rush to turn on the machine, it is easy to crash, please turn on again later.
3. The MCU program is damaged, and the program needs to be re-programmed
4. The internal power supply chip is damaged and needs to be replaced.
three. It cannot be used for normal measurement, the resistance cannot be accurately measured, and the capacitance and inductance errors are huge.
1. The charged capacitance was accidentally measured, and the charged circuit was measured. Break down the bridge to test the front-end protection diode,
You can unscrew all the screws from the case, lift up the panel, and the BNC cable can be bent.
Do not need to cut, remove the key board, self-test and replace the broken IN4148.

2. Test the core wire of the clamped wire for open circuit, or short circuit between the core wire and the shielded wire, use a multimeter to measure and find the cause,
The test clamp and BNC head can be disassembled for self-repair.
3. Perform the open circuit and short-circuit clearing operations of the bridge test clamp, and press ZERO together with the clamps to clear the short-circuit.
If the test clip is not clamped together, press ZERO to clear the open circuit.
4. The bridge calibration data is out of order and the default parameter values need to be restored.
Steps to restore default parameter values:
Press the MENU (M) key for 5 seconds to enter the main menu.
Then press the "Range (RNG)" (R) key to enter the calibration mode
Then press the ZERO (C) key 5 times in succession
The default value will be loaded: Z0 becomes 76 Z= X.00 (X= 1---15)
Press HAND (L) to save! (At this time, the buzzer does not sound) is the default,
Then long press the MENU button, then press CLR (X) to exit and return to the measurement state
Restore the default value, do another open circuit, short circuit clear,
It can be measured, and the accuracy is better than 0.5% at this time
Real shot test chart of electric bridge:
Resistance test chart (with 6 resistors are 0.1% precision of 0.25W blue as shown in the first picture below)


Шкбку из натуральной овчины заказывала для себя. Доставили оперативно, как раз успели дл зимних холодов. Шуба легкая, качественно пошитая. На... Читать отзыв полностью...

Решила своему мужу на день Святого Николая сделать хороший подарок и подарить трусы из хлопка. Мне понравилась эта модель трусов,... Читать отзыв полностью...

Платье очень деликатное и умело подчеркивает все достоинства фигуры, особенно талию. Отлично подойдет как в офис, так и на прогулку... Читать отзыв полностью...

Так, я бы сказал выглядит "старинно" или наверное, как сейчас говорят "винтажно"! Его ещё можно дополнить, а тут по своей... Читать отзыв полностью...

Довольно долго выбирал подарок моему маленькому внуку на Новый год до данной модели гоночного вагона. Остановил выбор именно на ней.... Читать отзыв полностью...

Давно искала подходящую легкую весеннюю обувь. Наконец-то я нашла эти прикольненькие балетки, что не только красиво смотрятся. но и очень... Читать отзыв полностью...